Magnetic Clasp from Metal Clay, Part 1 – Free Project
There are two projects that did not make it into my upcoming book – two types of magnetic clasp (the third is in the book, which is going to press next week). The clasps are made from steel clay, taking advantage of its magnetism, and require no glue or any other kind of “magic adhesive”. Here is the first one. All it is is two tubes, capped on one side.
1. Make 2 tubes over a fat straw, from 1/2″ strips of steel clay (regular or Pearl Grey Steel), 3 cards thick. Dry them.
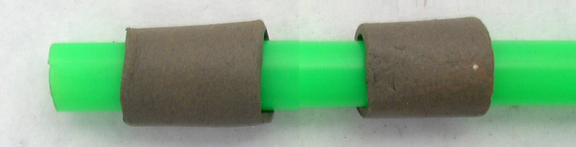
2. Roll a layer of steel clay, 3 cards thick. Wet it, and place the tubes on top of it, with one opening facing down.

3. Trim the excess clay from the layer around the tubes. Without picking them up off the card, carry them to the warming pan to dry.

4. Once they dry, drill two holes in each tube, close to the open side.


5. Fire the tubes. For the firing schedule, refer to the Instruction Manual (also linked on the right-hand pane of this blog).

6. Pick magnets with a diameter that fits inside the tubes. You can fill the tubes with a few magnets, as long as they don’t block the holes. The more magnets you fit, the stronger the clasp will be. Strong magnets are available from hardware stores, as well as from Amazon (look up “rare earth magnets“).

Once you fit the magnets in the tubes, it will be very hard to take them out. Make sure that the magnets at the bottom of the respective tubes are “opposite poles” that attract each other, not “identical poles” that repel each other!

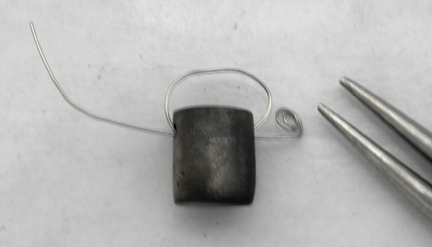
7. For each tube you need a jump ring, and a piece of wire. The wire can be copper, bronze, or silver (steel or nickel-chromium wire will not ball up). Pick a gauge that fits through the holes. Ball up one end of the wire. This ball can be done with a micro-torch, unless it is 18 gauge or thicker.

8. Insert the non-balled end of the wire through one hole of the tube. Then insert it through the jump ring, and through the second hole.

9. Ball up the other end of the wire. Now use an oxygen/propane torch. The balling up will be so fast that the heat won’t affect the magnets. For instructions on balling up wire on both end see my book: The Handbook of Metal Clay: Textures and Forms, 2nd edition, pp. 30-31, or watch my video Balling-up a Wire at Both Ends on YouTube (also embedded in the Videos section of this blog, which can be accessed from the top bar or from the right-hand pane).

10. Connect a chain to the jump rings.

Variations:
Insert a wire through both holes. This wire has to be thin enough so that two pieces of it can fit in the same hole.

Pick one end of the wire, bend it above the tube, insert it through the opposite hole from the outside, and then again through the hole it came out of, from the inside.

Now you can ball up both ends of the wire, using a propane/oxygen torch.
Or: if you have no such torch, coil the end of the wire.


There are quite a few things you can do with this clasp, and my 14-year-old daughter, Naomi, volunteered to model.


No child was hurt during the shooting of these photos. In fact, Naomi says that she has the best parents ever! Are we lucky or what?
May 15th, 2011 at 7:19 pm
Naomi- It’s so you…….
May 15th, 2011 at 7:24 pm
Nuh uh.. o.-
May 15th, 2011 at 8:23 pm
That is so cool….I am so glad I chose you to learn from….even if it’s distance learning.
Thanks so much,
Melody
May 15th, 2011 at 8:28 pm
So now we have to get creative about where we *put* the jewelry we make?? Naomi and Hadar, you are a frightfully inventive team…
May 15th, 2011 at 9:00 pm
what fun this is! now i can have the “plug in the ear” look without the big saggy hole!
May 16th, 2011 at 6:10 am
Just what I needed to read on a Monday morning! Thank you Hadar and Naomi both.
May 16th, 2011 at 7:52 am
I’m heading back into action again and love the clasp AND
Your daughter is a classic beauty. What a lovely young lady!! I’m working on great-grandkiddles and it’s so much fun to have beautiful kids around you . . . particularly when they think you’re the best!
May 16th, 2011 at 8:17 am
LOL
Now I feel all special ^_^
May 16th, 2011 at 1:05 pm
My daughter would love it. Magnetic earrings are the answer to expressing yourself without the pain.
May 16th, 2011 at 1:59 pm
So simple yet really effective
love it!
May 16th, 2011 at 6:44 pm
Thanks for the great info! I just home Naomi did the “up the nose” photo last! LOL
May 17th, 2011 at 9:28 pm
Hilarious photos . . . cute daughter!
May 18th, 2011 at 4:41 pm
The clasp is too awesome for words 🙂
Charming, Naomi. I especially like the nose plugs. They’re so _you_.
May 23rd, 2011 at 7:16 pm
These are so great! Thank you! ….and I knew Naomi would be beautiful.
May 13th, 2012 at 11:42 pm
Naomi makes a great model! Love the idea!