Photography Tip
My studio became so crammed with junk that it was impossible for students to move around. Getting rid of some junk would not do the trick because I can’t stop collecting it. So, I spent the day at IKEA looking for tables that would take up less space. On the way out I picked up another piece of junk, a trash bin that cost $1.99.
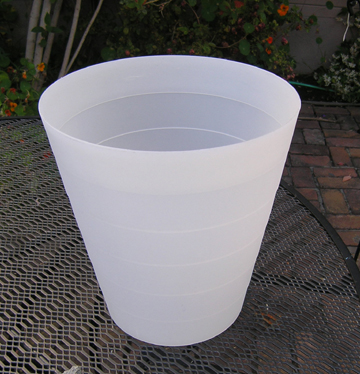
At home I asked my son to cut a hole at the bottom of the bin. He heated a knife on the gas stove, and it slid through the plastic. If you do this, wear a mask and ventilate, because the knife gets coated with plastic, and when you heat it again, the plastic burns with toxic fumes. I am sure I could have cut the hole with a sharp knife or a saw, but that would have been more time-consuming.
The diameter of the hole is slightly bigger than my camera lens.

Then I turned the trash bin upside down and set my camera on top, with the lens poking through the hole into the bin. I took a few photos, and then took the same photos, under the same conditions, with my old plastic light-diffuser, which cost me almost the same price as my 35mm film scanner: $200.


The photo on the left was taken with my old light-diffuser. The one on the right was taken with the trash bin. At this point I had not Photoshopped either photo.
The shutter speed was half a second in both photos. Using my old light-diffuser I changed the speed to one second.


The photo on the left is the new photo. The one on the right is the one above, the original one taken with the trash bin.
I then Photoshopped the photo that I took with my old light-diffuser. First I made it lighter.

Photo taken using my old light-diffuser, made lighter with Photoshop
Then I increased the contrast.

Photo taken using my old light-diffuser, with increased contrast
And this is again the original photo taken with the trash bin, not Photoshopped.
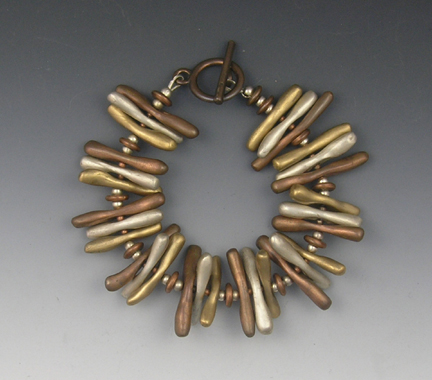
Original photo taken inside trash bin, no Photoshop
I am sure there are other devices you can use, such as lamp shades and plastic containers, that will produce good results quicker and cheaper than a commercial light-diffuser. They only need to be white and opaque. If they are too translucent, you can wrap or cover them with white paper. If you have a booth tent, the white synthetic fabric walls will do just fine to prevent the glare.
July 5th, 2009 at 10:58 am
Hadar, what lighting are you using, and where are you placing it in relation to the basket?
Maybe you could either photograph the entire setup (lighting AND trash can “diffuser) from the outside?
July 5th, 2009 at 11:13 am
I was in a photography class. He recommended a prop up mirror. You know the kind where one side flips to be magnified and the other side is satandard. Use two of them to help direct reflected light onto your subject. You can get them at the dollar store!
July 5th, 2009 at 11:41 am
Did you have your bracelet on glass? Thanks for sharing this!
July 5th, 2009 at 11:53 am
Marilyn, I am using Ott light. I took a photo of the setup with my cellphone (my camera being part of the setup). If the quality of the photo is reasonable I will post it soon.
Leslie,
Great tip! Thanks!
Michele,
No glass. It’s gradient paper background. You can get it at http://www.tabletopstudio.com.
July 5th, 2009 at 1:19 pm
amazing! thanks for sharing this tip; i totally need help with my photos!
July 5th, 2009 at 2:09 pm
This is very cool Hadar. I myself have refused to buy one of those expensive contraptions. You are so clever!
Catherine
July 5th, 2009 at 7:33 pm
I use a gallon milk jug with the bottom cut out for my smaller pieces. The hole in the top is just right for my little camera lens. I’ve also cut holes in the bottoms of various sized tupperware containers. White tissue paper works really well with containers that are too translucent. It has a way of propping itself up around the outside of the container.
Thank you Hadar for everything you share on your blog. You are an inspiration to all of us who work with metal clay, and a great example of how to be generous in sharing what we learn.
Barb
July 6th, 2009 at 11:49 am
Awesome, Thanks for the tips and your continued devotion to art and beauty.
July 6th, 2009 at 1:59 pm
Thank you so much for the info…It will be so handy and save me a lot of money and time researching this topic!
July 6th, 2009 at 9:23 pm
Hadar, the trash bin is great! I too use Ott lights with white paper towels wrapped around them. Works perfectly. Then when the timer is going I have a small piece of paper towel I move around on top of the object to direct the shadows. This I do while looking at the screen.
Great blog Hadar, you are the best!
Cant wait to see you in January
Donna Lewis
Scottsdale, AZ
October 16th, 2010 at 6:46 pm
You have a awesome site you have! Wonderful job!