Make Your Own Shibuichi Clay
Shibuichi is an ancient Japanese alloy of copper and silver, with the percentage of silver ranging between 5% – 25%. There is a very informative article about this alloy in March 2010 issue of Art Jewelry Magazine by Lee Rumsey Haga, which I highly recommend.
I have been often asked about combining different metal clays together, so I decided to try. I made “Shibuichi clay” of 5% silver and 95% copper, using mixed Quick-fire copper and PMC Plus.
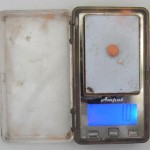
One way to measure is to use a scale. To make 10 grams of this type of Shibuichi clay, mix 0.5 grams silver clay with 9.5 grams copper clay.
If you don’t have a scale, roll the clays into layers of equal thickness. For example, roll each clay between two stacks of 4 cards.
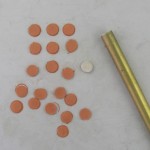
Next, use a straw or a another cutter to cut one circle of silver and twenty circles of copper out of the layers.
To make an alloy with 15% silver, cut 3 circles of silver and 17 circles of copper.
To make an alloy with 25% silver, cut one circle of silver and 3 circles of copper (use a bigger cutter, of course).
Then mix the clay with your fingers, and roll it under the rolling pin over an over until you get a homogeneous color.
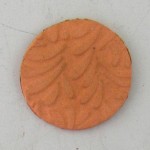
I pressed the clay against a texture with high relief.
I fired it with a torch for 6 minutes from the moment the binder had burnt off, and immediately dipped in water.
I found that torch-fired Shibuichi clay is stronger than torched-fired copper clay.
I also tried it in a kiln. Using my new firing method as described in my previous posting, I fired it for 1:00 hour at 1470°F (800°C) in my top loader kiln. In a front loader, fire at 1550°/843°C.
At this point, you can either start playing with patinas or, if you want to clean the piece first, dry it thoroughly on a warming surface.
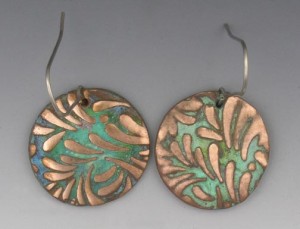
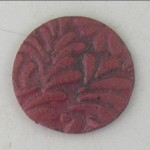
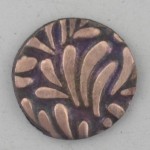
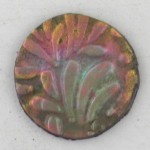
Shibuichi is very receptive to patinas. Here are some examples:
The last example was done by gently heating with a torch and dipping in water when the desired color was achieved.
Since metal clay is so porous, you will need to apply the patina more than once. I placed the piece on my warming surface and applied it with a brush. At first the liquid was totally absorbed into the metal. With every further application the colors developed more and more. Sometimes they developed after I removed the piece from the warming surface and let it cool down.
When the color was achieved and the piece was dry, I sanded the high part of the relief, first with 220-grit sandpaper, then with 400 grit.
The patina can be sealed with lacquer spray or with sealers from the sources below.
Sources:
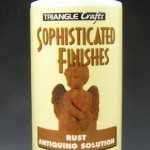
Rust, blue and green patinas are available from hardware stores, or from craft stores such as Blick and Michael’s. The series is called Sophisticated Finishes.
Another source is www.sculptnouveaux.com. They also have different sealers and their products come with full instructions.



February 6th, 2010 at 2:36 pm
Hadar you are amazing! I just read this article and was wondering if it was possible with metal clay. Thank you so much! I can’t wait to try it out.
Jane
February 6th, 2010 at 2:50 pm
Hadar I too read the article and immediately thought of you…I just knew you’d be on this. Wonderful results!
Tamara
February 6th, 2010 at 3:09 pm
Thanks so much for sharing this with us. Your kind, giving personalityjust truly amazes me! You are the bomb!
February 6th, 2010 at 3:16 pm
Lovely – I love playing with diy clay so when I eventually get some copper clay I’ll try this for sure.
You are a mine of inspiring info
February 6th, 2010 at 4:30 pm
Wow Hadar, This is very exciting I will be giving it a try for sure.
Thank you for this wonderful blog, I really love
it!!
Thanks!!!!
February 6th, 2010 at 4:33 pm
This is exactly what I was looking for. I haven’t read the article but I will. I love that it can be done with metal clay. Thanks also for the new box construction diy. The ceramic one that you show, built with posts and shelf…how is it adhered together?
February 6th, 2010 at 4:57 pm
Looks like something the Metal Heads should try for their next play day!
February 6th, 2010 at 4:58 pm
Hadar as usual you are awesome. I so appriciate what you discover and share with us!
February 6th, 2010 at 5:41 pm
Linda,
It’s not adhered. It’s just stable this way.
February 6th, 2010 at 6:07 pm
Have you tried steel with silver or steel with copper?
February 6th, 2010 at 6:11 pm
What kinds of properties does the silver/copper mix have that makes it different from copper alone? Have you tried a higher percentage of silver? I suppose we could make sterling silver too by mixing 92.5%/7.5%… but is there any benefit? I imagine that adding a small amt of copper to silver it would be less soft after firing and would work better for rings. My fine silver rings easily bend out of shape and get deep dents in them. What do you think?
February 6th, 2010 at 6:33 pm
Jenny,
I have not tried steel with silver. I did try steel with copper but did not get an intersting color.
The mix is different in color; it slighly lighter and more delicate than copper. It also melts at a lower temperature, which explains why the sintering was better with a torch than that of copper. And the colors from patina and heat are also different.
Higher pecentage of silver makes lighter color. 25% looks almost like rose gold. It also lends itself better to depletion guilding.
I don’t think that sterling silver clay will make stronger rings, because of the porosity of metal clay after it’s fired. I may try to make it, though, to see if there are other benefits.
February 6th, 2010 at 7:03 pm
I keep saying it and will continue to … genius!
February 6th, 2010 at 8:26 pm
I was enamored by the bracelet on the cover of Art Jewelry, and then to get this from you is very exciting! Thanks for all you do and for being so gracious in your sharing.
February 6th, 2010 at 10:23 pm
once again I don;t know how you do it all
February 7th, 2010 at 4:45 am
This would enamel well, shouldn’t it?
February 7th, 2010 at 5:25 am
I would like to be a “fly on the wall of your studio” to observe your amazing use of a 24-hr day. You try and test everything, then photograph your steps and results, then share your results with all of us. Thank you so much. You are truly an inspiration to us all.
February 7th, 2010 at 7:23 am
Hadar, Thank you so much! I appreciate how you push the envelope and continue to inspire us. I have been wanting to do this since I first heard copper clay was coming out. I just never have the time. I can live vicariously through you 😉
Again, thank you for sharing and being generous with your knowledge.
Cheers,
Tonya
http://www.wholelottawhimsy.com
http://www.tonyadavidson.com
February 7th, 2010 at 8:29 pm
Wow Hadar – so timely with the Art Jewelry article peaking everyone’s interest. You are amazing – can’t wait to do mixed metals with you in April in Colorado – will be do a Shibuichi mix?
February 7th, 2010 at 8:58 pm
Alcina,
Yes, it should enamel well.
Cindy,
We can do that if we have time. Can you have some patinas handy?
February 9th, 2010 at 8:17 am
I tried mixing 20% steel with 80% silver. It sintered poorly and was … to put it simply… UGLY. It tarnished as soon as I stopped cleaning it. Black just kept coming off of it no matter how long I sanded and brushed it…
I tried a 50/50 mix of steel/copper. It looked like rusted steel. It sintered very well at a lower temp than steel alone. At higher heat it bubbled and pitted like bronze. I dont know if I would try it again, other than that the clay itself was much easier to work with than steel.
I am having a really hard time working with steel clay as it is so grainy. Do you think that adding glycerin might help it to be smoother?
February 9th, 2010 at 9:29 am
I am just new to metal clay and I have a question about the purpose of using a fiber blanket instead of using a metal box. Specifically what are the benefits one over the other. It is my understanding that the fabric is very highly toxic and dangerous to use.
February 9th, 2010 at 9:55 am
Lori,
The advantage of the fiber blanket is better sintering and quicker firing. The stainless steel box is a poor heat conductor and inhibits sintering. It also oxidizes and contamintes the kiln. Eventually it will disintegrate. The fiber blanket is cheap, and keeps your kiln clean and safe. If you are worried about toxicity don’t use it. Build a ceramic box as described in my posting and instruction manual. It is a little more awkward to handle but just as efficiant.
February 9th, 2010 at 10:01 am
Jenny,
When you mix metals the melting temperature drops, and so does the sintering temperature. That’s why you got the bubbles. If you liked the color you can try lower the temperature. One of my students mixed steel and bronze and got a wonderful color. To your question: glycerin may help but I believe it will still get grainy. That why I make very small amounts at a time. When it gets grainy it also helps just rolling it over and over with the rolling pin. It makes it smooth again.
February 13th, 2010 at 7:38 pm
For more info on experiments mixing silver and copper check out http://medacreations.wordpress.com.
I have published some of my experiements and results there.