Aug 29 2010

“Mini-kilns” – Even Better

How didn’t I think of this before? If the little boxes were made out of the same material as the kiln….

For those of you who haven’t read my last posting, called “Little Boxes,” the idea is to improve the firing results by isolating the pieces from each other. Making a small box for each piece prevents heat from flowing from one piece to another, or as some of you prefer to phrase it, preventing the firing box from acting as a “heat sink.” This way, every piece has its own space and none of them interferes with the sintering of any of the others. Those boxes were made of fiber paper.

My new boxes are made from kiln bricks, creating “mini-kilns.” They are not as easy to make as the fiber paper boxes, but if you put a few hours into it, you will have durable, long-lasting, reliable firing boxes that you can use over and over.

I bought a soft fire brick at a local ceramic store. It cost me $4. It’s important to get a soft one. One brick is enough to make boxes for one kiln. You can make boxes of various sizes.

How to make the boxes

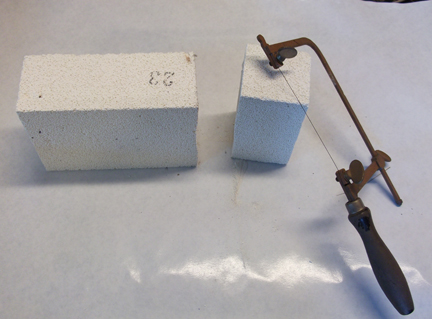
Use a pencil to mark the size of the box you want to make.

Using a jeweler’s saw or any other saw, cut the brick along the pencil mark. It cuts almost like butter.

You can lay the cutout part on its side – it will still be tall enough to make a firing box.

Then cut that one in half. Each of the halves will make a box big enough for a 1″ piece.

These are different grinding stones that you can use to carve out the inside of the brick. They usually come as attachments for rotary tools and can be purchased individually at hardware stores.

Mark the inside measurements of the box. The walls can be as thin as ½” or even less.

With the grinding wheel mounted on a rotary tool, start a pilot hole at the center of the brick. You will find it surprisingly easy and quick. There will be a lot of dust. Be sure to wear a mask and goggles.

Continue drilling, going both deeper and sideways, until you reach the pencil marks.

How can you tell when you’ve drilled deep enough? I left the bottom of the box about ½” thick. Measure the height of the box. Then put the ruler inside the box to see how deep it is.

16

Here are more boxes in different stages of preparation.

If you have a drill press, the process will be even faster. Just hold the box in your hands and move it around until the hole reaches the desired depth and the pencil marks.

11

Here are the boxes arranged in the kiln. The are elevated on posts. The two in the front are a little separated because this is where the thermocouple is located.

12

Fill them with ½” carbon.

13

Put in your pieces. Most of these are mixed copper/bronze pieces. The one on the top left is hollow. The box on the bottom left has two pieces. There are also two boxes in the center of the kiln.

Mini kilns 025

Cover the pieces with more carbon.

Every piece, including those in the center, sintered. In fact, some felt like they were over-heated, so in my next firing I am going to fill the boxes with carbon all the way to the top.

Some kilns tend to consume more carbon than others. If you see a considerable amount of ash after firing, or if the pieces get exposed to air, cover the boxes loosely with fiber paper.


Aug 26 2010

Little Boxes

I seem to have moved one more step forward on the ongoing path toward better sintering. I was thinking about the analogy of “twins in the womb” and how to extend it to apply it to pieces in the firing box. If twins in the womb steal nutrition from each other, could that be what happens to pieces in the box? If each of them had its own separate space, would they not manage better somehow?

I usually avoid placing a small piece next to a big one, since in my experience, the small ones do not sinter properly. This seems a bit counter-intuitive, since I would expect smaller pieces to sinter better. However, statistically this is the case, and it may be because the heat flows towards the bigger and heavier pieces. So theoretically, if we surround each piece with an insulator such as fiber paper, the heat may not be able to flow from one area in the box to another.

I made a small box from fiber paper for every piece I wanted to fire in a single batch. I filled the kiln with more pieces than I usually do – each in its own little box – and included small, big, and hollow forms of copper and bronze. I used my regular firing schedule for Quick-fire Copper and Bronze, and all sintered beautifully.

Here is how to make the box:

Use fiber paper, ⅛” thick (cheap, and available from glass fusing supply stores). Cut a square.

Cut squares at all 4 corners, each about 2″ square.

Fold the wall upwards and staple.

03

Make boxes of varying sizes for different-sized pieces.

Fill half of each box with carbon.

Place the pieces in the boxes and fill the boxes to the top with carbon.

Fit as many boxes as you can in the kiln, avoiding the center. (Or could it be that with this method, there is no need to avoid the center of the kiln? I tried it once, and it worked!)

I have fired three times so far in the same boxes, and both the paper and the staples are still intact.

Here is another option: use the fiber board box that I described in my last blog posting.

Cut strips of the same fiber paper, about 2″ wide, and use them as separators.


Aug 13 2010

Please Make Us a Box!

I wish someone would manufacture a fiber box that we could buy and use as a long-lasting firing box for our base metal clay. How hard can it be? Just a step further from the fiber board we use as a kiln shelf.

Until then, here is how you can improvise a fiber firing box.

Buy 2-3 fiber boards. The cost of each is $8-$10.

Use a craft knife to cut a square inside one or two of the boards, about 1/2″ away from the edges. Now you have a fiber “frame.”

t-01

The uncut fiber board will serve as the “floor” of the box. Place the frame on top of the “floor.”

t-02

As an option, to create a deeper box, two frames (rather than just one) can be placed on top of the “floor,” as shown in the photo below.

t-03

Insert nickel-chromium wire (a.k.a. nichrome or high-temp wire) through the frame and through the “floor” board.

t-04

Pull the wire through the “floor” and across the outer side of the “floor.” Re-insert the wire through the outer side of the “floor,” and pull it out through the frame.

t-05

Cut the wire, leaving at least a 5″ length of wire on each side.

Repeat this with the other two sides of the box.

t-06

When making a deep box, instead of a second frame, you can use strips of fiber blanket.

t-07

(As an alternative, you can take the small square which you cut out to create the first frame, cut it into strips, and stack the strips on top of the first frame.)

Tie the four ends of the wire together to make a handle for the box.

t-08

t-09

As a reminder, rather than using a box, you can simply arrange kiln posts around your kiln shelf to make a box.

t-Fiber alternative

(This method is described in the instruction manual for Hadar’s Clay™ Quick-fire Copper and Bronze.) Although this method works fine and is easy to construct, the disadvantage is that it cannot be removed as easily from the kiln, since the kiln posts are not held together.


Jul 21 2010

Compatibility Chart for Firing Different Clays Together

This is long due, but I have finally been able to do what many of you have asked for: create a Compatibility Chart reflecting which metal clays can be fired in one piece, in one firing, and at what schedule. The chart also shows which metals can be fired together in more than one firing. Please download the file from the right-hand pane of the blog.

This chart goes hand in hand with the file “Firing Schedules for Hadar’s Clay™ – Quick Reference Table”. This file has just been updated and includes firing schedules for Quick-fire copper, bronze, White Bronze, steel, and Pearl Grey Steel.

The expanded instruction manuals for all of these clays have also been updated. The Instruction Manual for Hadar’s Clay™ – Quick-fire Copper and Quick-fire Bronze in particular, includes instructions on how to make the firing box, what carbon to use, how to position the pieces and the box in the kiln, etc.

I hope you find it helpful.

One important update is how to fire together copper and White Bronze, or copper, bronze, and White Bronze. This does not require a special kind of copper powder and can be done with the existing Quick-fire copper.

t-Lentil

I am still trying to shorten this firing schedule, but what works so far is firing the mixed metal together, repeating the firing schedule for White Bronze (i.e., firing twice in succession according to that schedule), with two hours hold time in each firing instead of three.

Sometimes the copper and the White Bronze react and create a third bronze color, as you can see in the photo. This may eliminate the need to include bronze in order to achieve the three colors in one piece.

The combination of copper and White Bronze has a beautiful effect when it is applied in caning and mokume-gane techniques. These are techniques that I am exploring at present and have already presented in my workshops in Europe. They are also the topic of many workshops scheduled for this year and next.


Jun 18 2010

Pearl Grey Steel Clay is Now Available

t-Mountain

Pearl Grey Steel is now available for sale from my online store.

The instruction manual is posted in the right-hand pane of this blog, along with the other manuals, as well as on the product page within the online store, linked above.

How is Pearl Grey Steel different from the regular steel clay?

The Pearl Grey Steel metal powder is silver-gray in color. It is very pliable and soft, and does not become grainy after being stored in the refrigerator, even after many weeks. It also leaves your hands clean.

The firing is done in one phase. The firing temperature is the same, but the ramp is slower. The firing requires holding at 1000°F/538°C for between 30 minutes and 1 hour before continuing to the sintering temperature. Firing time is less than 4 hours.

The fired clay lends itself to sanding and smoothing, which results in a pearl-gray color. Like White Bronze, it is not flexible and should not be bent or hammered.

Pearl Grey Steel is compatible with copper, bronze, and White Bronze. It can be fired with copper in the same piece. Sometimes a bronze-color halo is created at the border between the two metals, as shown in the photo above.

To combine Pearl Grey Steel with bronze and White Bronze, the steel has to be fired first.

To see more photos of Pearl Grey Steel jewelry, please see this posting.

I hope you enjoy it.


Jun 12 2010

Additions and Corrections to My Travel-Teaching Schedule

The file “Hadar’s Travel-teaching Schedule,” available on the right-hand pane of this blog, has been updated.

First, a correction: The workshop in Rochester, NY, is actually two workshops, back-to-back: September 30-October 1, and October 1-2. The workshops take place at Studio 34 Creative Arts Center and Gallyer. You can take one or both workshops, since there is a lot of material to be covered. Recently developed techniques of “caning” and “mokume-gane” in metal clay will be presented. If you read this posting through, you can see photos of pieces made using these techniques.

A workshop has been added to this year’s schedule, on November 15-16 at Amado Territory Ranch, 30 miles south of Tucson, Arizona. Please contact www.exPRESSiveArtsStudio.com. This workshop will be entirely dedicated to “caning” and “mokume-gane” techniques, and on applying them to hollow forms. Some firing may be done for demonstration, but the class will focus on learning as many of these techniques as possible. Students will be expected to arrange for their own firing after the workshop. At this workshop I hope to meet up once again with students who took my workshop in Phoenix. The Amado Territory Ranch workshop is, in a way, a further step toward more advanced techniques.

So is a very similar advanced workshop that will take place in Los Angeles in February 2011, probably on Presidents’ Day weekend. It will take place again with the Local PMC Guild chapter. I will post the dates and contact information soon.

Another such advanced workshop will take place at Brighton Beads, Brighton, MI, on June 15-16, 2011. Immediately after this workshop, on June 18-19, I will be teaching In Saint Joseph, MI, at Krasl Art Center. This workshop will focus on making hollow forms and, for people who take the class at Brighton Beads, the application of caning and “mokume-gane” designs to hollow forms.

About the Structure of the New Workshops

In the course of nearly a year of intense travel-teaching I have been firing in many types of kilns. I won’t bore you with the details, but I have learned that no kiln is predictable and there is no way to guarantee firing results without testing individual kilns. These workshops are usually big, and many kilns are required. Based on all of this, I’ve decided that for workshops that are added now and in the future, I will fire only for demonstration purposes, and will dedicate most of the time to teaching more techniques and making more pieces. You can fire your pieces, or have them fired for you, after the workshop. This will make it possible for me to devote my attention to you rather than to loading, watching, and unloading kilns.

Unless I am asked to make changes, workshops that have already been scheduled will be conducted as advertised.

“Caning” and “Mokume-gane”

Why the quotation marks? Because the techniques I apply produce a similar effect to those of caning and mokume-gane as they are used in metalsmithing, polymer clay, and glass millefiori, but are not necessarily produced using the same methods as in those mediums. I must thank here Jen Tattam for planting the idea for these techniques in my head while experimenting at a workshop in Australia.

Two photos of these techniques were included in a previous posting. Those were made with three metals – copper, bronze, and White Bronze. Here are some more with copper and bronze:

t-Mokume 1

t-Mokume 4

t-Patch circle

t-Mokume 3

t-Caning

t-Sqaure and circle

t-Sphere 1

t-slump


Jun 7 2010

Three Metals, One Firing

It may be too early to get all excited, but this experiment has worked a few times now. I was surprised enough to discover that bronze and white bronze can be fired at the same time. I wasn’t too excited, though, since the contrast is not so sharp, and patina doesn’t make it any sharper.

So, I tried to fire all three metals together, copper, bronze, and White Bronze, with very little hope. I could not believe that copper could sinter at such a low temperature. Here are my results:

t-Mokume mixed

t-3-panel mixed

The center panels in these earrings are a combination of copper and White Bronze only.

t-Lentil

This one is a two-sided hollow form (lentil).

The firing temperature is the same as for White Bronze. I am not sure yet how long the firing should be, what the size and thickness limitations are, and how way the metals should be combined. I am almost sure the latter is an important factor.

The funny thing is that a test piece, all copper, sintered just fine.


Jun 4 2010

My First Book

My first book The Handbook of Metal Clay: Textures and Forms is now out of print. This book has been well received, and sold out pretty fast. It received good reviews — one reviewer even asked me never to stop printing it. However, instead of re-printing it as is, I’ve decided to revise and update it, to accommodate the changes that have taken place in the past 3 years.

I would love to include work that you have done that was inspired by the projects in this book. If you are interested, please send or email me high-resolution photos. As with my second and third book, I can’t promise that the photos will be included; it depends on the quality of the photo and the space available. The artwork can be in other metal clays, not just silver.

There is no deadline. I will publish the book as soon as soon as I finish revising, so please please don’t wait too long.


May 22 2010

Updates, and Pearl-grey Steel Clay

My travel-teaching schedule has been updated. You can download it from the right-hand pane of this blog. New workshops have been added in 2011 in Pittsburgh, PA, Cleveland, OH, and Brighton and St. Joseph, MI.

I have just come back from a workshop in Texas and am preparing for a 3-week teaching trip to Europe. I will be teaching in the UK, France, and Norway. The store will stay open during this time and you will be well taken care of.

The rest of this year I will be teaching in Seattle, WA (August), The Netherlands (September), and Rochester, NY (October).

The participants of the workshop in the UK, hosted by Tracey Spurgin in East Yorkshire, will have the first chance (except for my local students) to experiment with Pearl-grey steel clay, which I hope to release after my return from Europe. This is a new type of steel clay, gray in the state of clay and pearl-gray in the state of metal. Unlike my traditional steel clay, it lasts a long time when stored in the refrigerator and does not turn grainy. It is as creamy and soft as the rest of my clays. After firing, it can be easily sanded smooth and brought to a matte finish. In reaction to patina it turns dark blue instead of hematite-black. It is compatible with all my other clays, and can be fired in combination with copper. The sintering temperature is 1750°F/955°C in a top loader, 1830°F/1000°C in a front loader.

Here are some photos:

t-Pearl necklace

t-Pear;grey earrings

The metals in the earrings above are (from top to bottom): Pearl-grey steel, bronze, regular steel, copper, and White Bronze.

t-Cube necklace

Same metals here. The center bead is patinated blue.

t-Pearl grey rock earrings

Hollow rock earrings.

t-Circle earringsThe Jewelry Artist.

t-Cracks with gold

This pendant was fired with a gold nugget.

t-Cracks with gold and patina

This is the same pendant with Birchwood Casey Super Blue patina (see instruction manual for steel clay).

t-Urchin

t-squaes in steel

t-Magnet Clasp

The pieces in the three photos above were fired with no bronze in them. Where did the bronze come from? I am not sure, but I am very, very happy.

t-magnet clasp 2

t-Magnet clasp textured

The pieces in the three photos above take advantage of the magnetic nature of steel. They are actually magnetic clasps.


May 5 2010

Update to Firing Schedule of White Bronze

After firing White Bronze almost every day since it launched, I have arrived at a new schedule that works for both thin and thick pieces. It involved a little surprise, but I’ll save that for later.

Here is the new schedule:

Ramp at full speed to: 500°F/260°C; No hold.
Ramp at 400°F/222°C to:
      1160°F/626°C (top loader kiln);
      1250°F/676°C (front loader kiln)
Hold for 3:00 hours

If you don’t want to deal with 2 ramps, use the following, simplified but longer schedule:

Ramp at 400°F/222°C per hour to:
      1160°F/626°C (top loader kiln)
      1250°F/676°C (front loader kiln)
Hold for 3:00 hours

Total firing time is 4:00 to 4:30 hours.

You will find programming instructions on page 4 of the White Bronze instruction manual. All of the manuals – for Quick-fire clays, for White Bronze alone, and the Quick reference guide – have been updated as of 5/4/2010. Please download the new versions.

The manual for steel clay will be updated with the upcoming launch of Pearl Grey Steel.

Now to the surprise. I had a little piece of Quick-fire bronze that needed re-firing. Having nothing to lose, I decided to add it to a batch of white bronze. The repair worked! I then fired pieces of bronze with White Bronze, using the above schedule for White Bronze, and all the bronze pieces fully sintered, although the firing temperature was lower by 300 degrees than what is required for bronze. It seems that at least in this case, slow ramping and longer hold time compensated for the lower temperature.

Furthermore, I included in this batch a mixed piece of bronze and White Bronze. Here it is, as it came out of the kiln:

t-From the kiln

And here it is after sanding and buffing:
t-After sanding

Why is this good news? First, if you have just a few pieces of bronze and White Bronze, there is no need for separate firings.

Second, contrary to what I thought before, in order to combine bronze with White Bronze, it is not necessary to fire the bronze first; they can be fired together following the White Bronze schedule.

So, if you want to mix copper, bronze, and White Bronze in the same piece, you have two options:

1. Fire the copper first, then add bronze and White Bronze and fire again;
2. Fire the copper and bronze first, then add White Bronze and fire again.

I am currently testing combinations of copper and steel. Copper and steel, too, can be fired in the same batch with the same firing schedule. There is no need for separate firings.

Pearl Grey Steel and copper can be combined in the same piece, and the results are amazing!