Aug 9 2009

Photos from My Workshop in Rhode Island

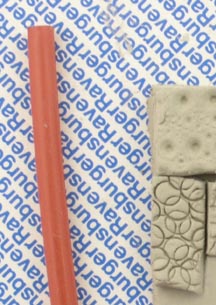
On the way to the class I was teaching in Bristol, Rhode Island, I stopped at Whole Foods Market. A bag of pasta caught my eye. It was pasta in the shape of calamari, which I’d never seen before. That day the class was about to make hollow forms and I thought how strange that I saw it precisely on that morning.

It was like bringing a box of candy to class. Almost everybody grabbed some to use as a mold for hollow forms. By the end of the day Jennifer Elliott had managed to finish a whole necklace of silver beads.

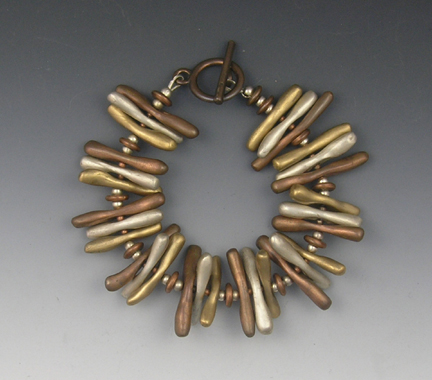
Other people took some home to make mixed metal hollow forms. This is the one I made:

Here are other pieces that were finished by the end of the class. Marjorie Barnes made these earrings and this necklace from copper and silver…

…which she was already wearing by the end of the class:

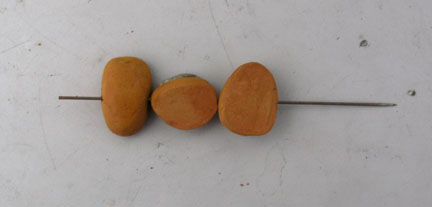
Marjorie also made hollow forms using rocks and rigatoni pasta as molds…

…as well as a folded hollow form from silver clay:

Sana Greene also made a folded hollow form from copper clay:

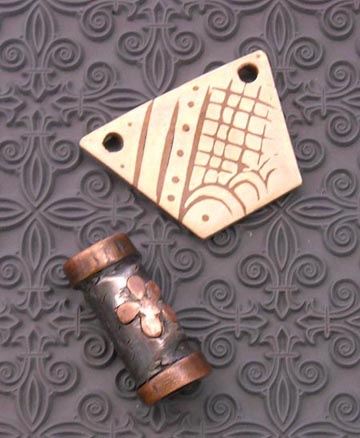
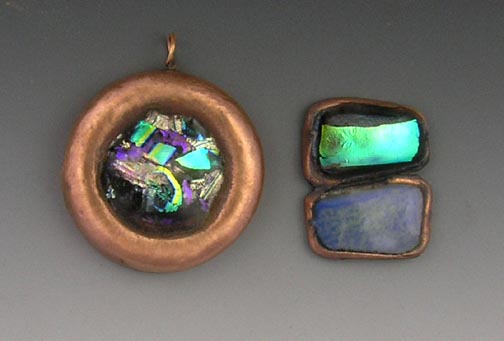
Alicia Buckler-White made a checkerboard pendant and earrings from bronze and copper clay:

Linda Busheeb made this pair of earrings combining copper and silver clay (sory for the quality of the photo):

Terri Wright made these earrings from copper and silver clay…

…and this hollow form from silver clay, with flush-set gemstones.

And Trish Connant made these three-panel earrings from all three metal clays:

By the end of the third day a lot of pieces were still waiting to be fired. All three kilns had a front door so the number of pieces fired in each kiln was limited. What I have learned in this class is that another variable that affects the sintering is the amount of power that kilns get when they are all working at the same time.


Jul 21 2009

Patina Revisited and a Source for Lids

Underlying Assumptions

There are two underlying assumptions that I detect in many of the emails that are addressed to me with questions. The first is that coconut carbon does not result in colorful pieces; the second is that if pieces are colored, that necessarily indicates that they are well sintered.

I am not sure at all that these assumptions are accurate. Here are some results from tests that I’ve been doing recently.

The following two photos show pieces that have been fired with coconut-based carbon. They are all well sintered.

The following photo also shows pieces that were fired in coconut-based carbon.

In spite of the colors, they all broke easily.

The square pieces in the following photo were fired in coconut-based carbon, at the center of the box. As you can see, they have better colors than the pieces lined up along the sides of the box. However, these, too, did not sinter.

The one thing common to all the colored pieces shown in these photos is that they were taken out of the box while very hot.

About the Lid

In one of my postings I mentioned that I do not use the lid that comes with the stainless steel firing box because it takes up too much space, both inside the box and in the kiln chamber. I use stainless steel sheet, 28 gauge. It comes 6” x 12”, and when I cut it in half (using just scissors) it makes two perfectly sized lids. I have been able to find this sheet at a local Ace Hardware store, but many local stores don’t carry it.

So here is an online source: www.ksmetals.com, and this is the item: http://www.ksmetals.com/retail.html (scroll down to the item before last). As you can see, KS Metals also have tubes that can be used as cutters and as molds for clay tubes. They only sell to retail stores, but on their site you can find a local store locator: http://www.ksmetals.com/RetailLocations.html .


Jul 8 2009

Photos from a Workshop in San Diego

I’ve just received photos from the workshop I taught last month in San Diego with the Metal Clay Alchemists Society. It was a my first travel-teaching class for this year. What a great start! I can’t wait until I get back there in November. Everybody worked under a lot of stress, since we started early in the morning and had to be out of the facility by 4:30pm. However, we got a lot done. Here are photos of some of the pieces. I apologize in advance for not being able to give credit to the people who created them.

Pieces straight from the kilns

Pieces straight from the kilns

Before finishing

Before finishing

After finishing

After finishing

The piece on the top right is a combination of inlay and overlay techniques. The one on the bottom left is syringe work of silver paste over copper.

Even I thought that these earrings should stay the way the came out of the kiln without doing any finishing. I hope the colors last a long, long time.

Pieces after finishing

Pieces after finishing

And here are some photos of us:


Jul 5 2009

Photography Tip (Continued)

By request I took a photo of the setup. (Excuse the quality; my camera is part of the setup, so I had to take the photo with my cell phone. Click on the photos to enlarge).

For those of us who have no IKEA close by, Sarah Triton sent me photos of a setup made with an old translucent lampshade form. The opening was filled by hot-gluing cardboard with a hole cut out the size of her lens.

Sarah's setup

Sarah's setup

Sarah's setup, top view

Sarah's setup, top view

Inside the shade

Inside the shade

And here are Sarah’s process shots of stripping fabric off another, bigger lampshade:


Jul 5 2009

Photography Tip

My studio became so crammed with junk that it was impossible for students to move around. Getting rid of some junk would not do the trick because I can’t stop collecting it. So, I spent the day at IKEA looking for tables that would take up less space. On the way out I picked up another piece of junk, a trash bin that cost $1.99.

At home I asked my son to cut a hole at the bottom of the bin. He heated a knife on the gas stove, and it slid through the plastic. If you do this, wear a mask and ventilate, because the knife gets coated with plastic, and when you heat it again, the plastic burns with toxic fumes. I am sure I could have cut the hole with a sharp knife or a saw, but that would have been more time-consuming.

The diameter of the hole is slightly bigger than my camera lens.

Then I turned the trash bin upside down and set my camera on top, with the lens poking through the hole into the bin. I took a few photos, and then took the same photos, under the same conditions, with my old plastic light-diffuser, which cost me almost the same price as my 35mm film scanner: $200.

The photo on the left was taken with my old light-diffuser. The one on the right was taken with the trash bin. At this point I had not Photoshopped either photo.

The shutter speed was half a second in both photos. Using my old light-diffuser I changed the speed to one second.

The photo on the left is the new photo. The one on the right is the one above, the original one taken with the trash bin.

I then Photoshopped the photo that I took with my old light-diffuser. First I made it lighter.

Old eqipment photo, made lighter with Photoshop

Photo taken using my old light-diffuser, made lighter with Photoshop

Then I increased the contrast.

Photo taken with old equipment, with increased contrast.

Photo taken using my old light-diffuser, with increased contrast

And this is again the original photo taken with the trash bin, not Photoshopped.

Original photo taken inside trash bin, no Photoshop.

Original photo taken inside trash bin, no Photoshop

I am sure there are other devices you can use, such as lamp shades and plastic containers, that will produce good results quicker and cheaper than a commercial light-diffuser. They only need to be white and opaque. If they are too translucent, you can wrap or cover them with white paper. If you have a booth tent, the white synthetic fabric walls will do just fine to prevent the glare.


Jun 28 2009

Questions about the “Collage Pendant” and “Fused Glass” Postings

Following the postings entitled “How to Begin” and “Using Metal Clay with Fused Glass” I was asked a few questions. Since they were asked several times, I am answering them here.

1. Is it possible to make this project with copper and silver?

First, it is possible, but not in the way that this project is described in my book. Copper and silver don’t stick together. They will separate after firing. They have to be connected in a mechanical way.

Second, unlike copper and bronze clay, either the copper or the silver has to be fired first. They cannot be fired together as clay.

2. Can it be done with silver and bronze?

No. The piece is most likely to end up as an unrecognizable yellowish blob.

3. What is the stone and how is it set?

It is a lab-grown green garnet, availbale from www.gemresources.com. It was set while the texture was still wet, pressed down as far as possible below the surface.

4. What is this texture?

It’s the lid of an orange juice carton. I used it directly, without making a mold first.

5. How did you make this texture?

By stamping the clay repeatedly with a coffee stirrer.

6. Why should the backing layer be made out of copper?

Bronze clay shrinks more than copper clay. If the backing is made out of bronze clay, the flat piece is most likely to curve. When bronze clay is laid over copper clay, it “stretches” itself to the dimensions of the copper.

7. Why dry the backing layer first?

Unlike with silver clay, cracks are most likely to form on the backing layer if it is not dried first. The cracks may show either before or after firing.

8. In the fused glass pieces, is there an opening on the back?

The back is solid.


Jun 26 2009

Using Fused Glass with Metal Clay

My knowledge about glass fusing is limited but a lot of the students that I have taught over the years are glass fusers. Naturally they wanted to combine their glass work with metal clay. In most cases they ended up constructing a bezel for their glass from low-shrinkage silver clay fired at a low temperature.

But how do we do this with base metal clay, which has to be fired in carbon? The temperature is too high for the glass and it gets pitted by the carbon (I have tried).

Here is my suggestion, and I would love to hear what you think about it and if you have further ideas: fire your copper and/or bronze piece first, leaving a space, or more than one space, for the glass. Then fill these spaces with your glass, and fuse it in open air as you would naturally do. There will be a black coat of oxidation on the surface of the metal, which can be removed by buffing or sanding.

You may get good results right away, but it is also possible that the glass will cab and pull away from the walls of the space in which it is laid. In this case, add more glass, or just clear glass, and re-fuse.

Here are the first results of my student, Ann, who experimented with this technique:

Glass fused in fired copper

Glass fused in fired copper

It seems to me that this opens up a lot of possibilities. In many pieces of jewelry that combine glass and metal, the role of one of them seems less important. Sometimes the glass is just an accent in an elaborate metal construction, and sometimes the metal is just a frame for a beautiful glass cab. Using this technique of preparing the metal part first may make it possible to create pieces in which the glass and the metal play equal and complementary roles.


Jun 26 2009

How to Begin?

Since I teach at my studio on an ongoing basis, beginner students often arrive who have never touched metal clay before. My first impulse is to hand them a package of silver clay. But then I look around and see everybody else in the class working with either copper or bronze clay, and ask myself: why start with silver? Just because historically it was there first? Wouldn’t it make more sense for a beginner to start with cheaper materials, so they can feel free to experiment without the fear of ruining or wasting precious material?

So now I work with beginners on bronze and copper clay projects, and it turns out that they are a lot less hesitant to work with these clays than students who have been working with silver for a long time. It’s not surprising, because beginners don’t have to deal with change, and change can be intimidating. I see people with unopened jars of base metal clay still working with silver. And I see people who work with bronze clay but have not opened their copper jars yet. So what do we do to overcome this anxiety? Where do we start with this new medium, which doesn’t seem to be going away?

I say: start with what is most familiar to you. Make something that you have made with silver many times and you feel confident about. There is no better way to learn the differences between the clays. For my beginners I hand out the very same project that I have been teaching to beginners for the past ten years with silver. This is the first project, “Collage Pendant,” from my first book: The Handbook of Metal Clay: Textures and Forms. There is hardly any way to go wrong with this project, and it sets them on the right track. It has occurred to me over the yeas that maybe I should change the first project, but the feedback from my more experienced students has always been: “Don’t fix what ain’t broke.”

So: how to go about it? First, here are a few tips for handling the clay:

1. Don’t mix more than a third of a jar at a time. A small amount is easier to mix and the consistency is likely to be much better. [Edited April 5, 2014] Because the ingredients of the clays may not be evenly distributed through the bottle (even when shaken), it is recommended to mix clay a whole bottle at a time. When stored properly, it will last for a long time.

2. When the weather is warm, cool your distilled water in the refrigerator, or drop a few ice cubes in it. Once in a while roll your clay to a thin layer, spray it with the cold water, fold it and roll it flat again.

3. Don’t leave your clay unsealed or exposed to the sun.

What are the differences between silver and base metal clay when making the “Collage Pendant” project?

1. You can use both copper and bronze clay in a single piece.

2. As your backing layer, always use copper clay.

3. Dry the backing layer before placing the overlays.

4. Watch the backing layer while it’s drying and flip it over as soon as it starts to warp. Keep flipping until it stays flat, or tape it to the work surface.

5. After placing the overlays and drying, check for cracks in the backing layer and seal them.

6. It doesn’t matter which clay you use to seal the gap between the layers.

7. Make a copper bail to match the copper backing.

8. After firing and finishing, use liver of sulfur sparingly, just enough to paint the background brown. Then burnish the high spots. You can use Baldwin’s Patina instead.

Before

Before

After

After

Pieces in progress

Pieces in progress


Jun 21 2009

Third Rock (Free Project)

This project was making its way into my upcoming third book about mixed metal jewelry from metal clay, but then I realized that it’s a variation on the “Sliced Rock Dangles” project from my second book: Silver and Bronze Clay: Movement and Mechanisms, p. 21. So I decided to post it here. This time it’s called Third Rock.

This project starts after step 4 of the “Sliced Rock Dangles” project is complete. We now have a set of 3 open rock parts, which are the top, middle and bottom of a rock.

5. Create three such sets, from silver, copper, and bronze clay respectively. (All of the photos in this posting show the copper rock, except for the photo of the finished earrings, which shows all three metals.)

6. For each of these sets, lay the open side of all three rock parts on a layer of the same clay, 3 cards thick. (In other words, the three silver parts should be laid on a silver layer, the copper parts on a copper layer, and the bronze parts on a bronze layer.)

7. Cut away the excess clay from around the thirds, and dry.

8. The two end parts of each rock are now closed hollow forms. Now close each of the middle parts by placing it upside-down on another layer of the same clay (silver on silver, copper on copper, bronze on bronze), 3 cards thick.

9. Cut away the excess clay from around the part.

All three parts in each set are now closed.

10. Drill 2 holes through one of the end pieces. Repeat this step with the rest of the end pieces.

11. Drill 2 holes through the sides of all three middle pieces (silver, bronze, and copper).

This is how the parts can be assembled.

The necklace version shown at the top of this posting was assembled using beading wire and spacers. And here is the earring version:


Jun 4 2009

Addition to My Travel-Teaching Schedule

Another class has been added to my travel-teaching schedule this year. The class is in Brighton, Michigan, at Brighton Beads. The dates are February 28-29, 2010. You can sign up on the website (www.BrightonBeadsandMore.com), or contact Nancy Garber by email at BrightonBeads@live.com, or by phone (810-844-0066).