Jul 24 2011

Introducing Pearl Grey Steel XT

Pearl Grey XT is the new generation of Pearl Grey Steel. It can be use in the same way as the previous generation (in combination with other metals), but when used on its own it is stronger and more resistant than the previous generation, and the surface is smoother and easier to sand. Like other base metal clay powders, it is not flexible and cannot be hammered to change its shape. It fires in two phases. For best strength it should be fired in the second phase at 1700°F/925°C in a brick kiln, and 1780°F/970°C in a muffle kiln, but good results are also achieved at 1650°F/900°C (brick kiln), and 1730°F/943°C (muffle kiln).

The instruction manual for Hadar’s Clay™ has been updated to include Pearl Grey Steel XT. There is no need to print it all again – you can simply reprint page 25 (and, if you like, the front cover, Table of Contents, and p. 24 to accommodate minor text changes), and replace those pages in your printed copy.

As far as testing goes, samples that have been properly sintered have been hammered with a steel hammer, tossed from a height of about three stories onto concrete ground, tumbled, and drilled, and they are still intact. Just saying, and please don’t understand me wrong: I absolutely do not recommend this as a way to test the strength and durability of metal clay art creations.

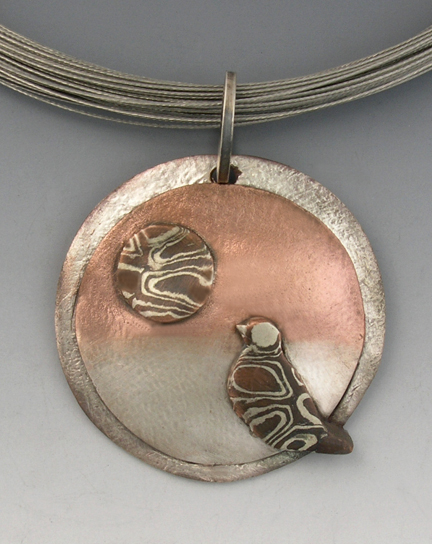
(the bird is White Bronze).

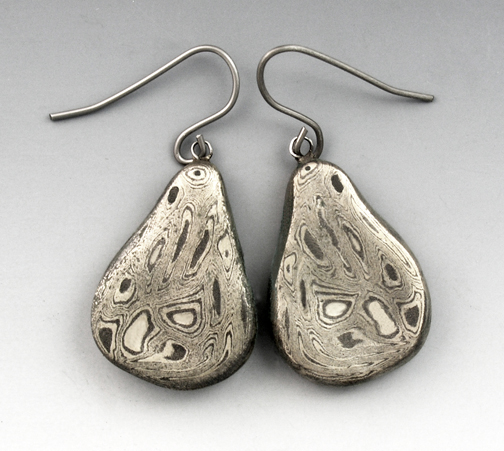
As you may have noticed, the volume of 100 grams of Pearl Grey Steel is about twice that of 100 grams of copper or bronze. That means both that 100 grams of Pearl Grey Steel goes a long way and, more importantly, that it makes very light-weight earrings.

I could not resist trying to make some rings. I have been wearing them for a week without taking them off, even when sleeping and washing my hands. The rings are not even sealed with wax, and still, they are not showing any sign of deformation or rust, and my skin has not been discolored. The shrinkage rate is still to be tested, but for now it seems to be about 2 sizes.

The potential of Pearl Grey Steel XT is still to be discovered. Besides rings, I can think of chains and bracelets, and especially jewelry for men.

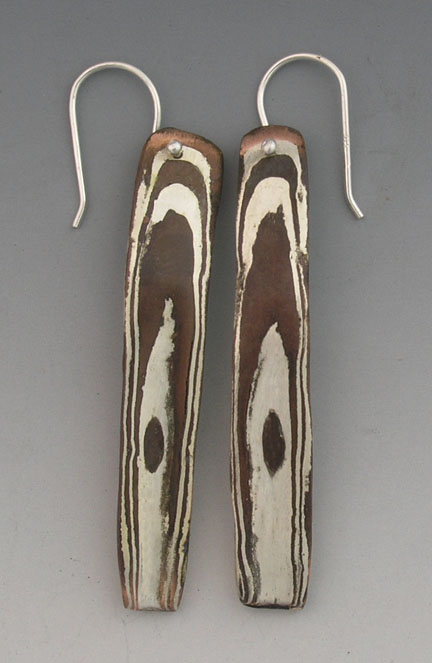
Pearl Grey Steel XT seems to be the best metal to be combined with Rose Bronze. It shows a nice contrast, and the shrinkage, when it is fired usnig the Rose Bronze schedule, is about the same. As a result, after firing, the steel and Rose Bronze are almost as flush as before firing and very little sanding is required. Also, a very small amount of Baldwin’s Patina will quickly darken the steel to create a better contrast.

Speaking of Rose Bronze, here is a pleasant surprise: since I made the pieces shown in my last posting, the textured part of them tarnished, and it tarnishes into a purple color:

If you like it, just seal it with working fixative spray.

Glass artist Janice Peacock experimented with enameling on Pearl Grey Steel:

Pearl Grey Steel XT is available in 50-gram and 25-gram jars.

The earlier generation of Pearl Grey Steel is available in both 100-gram and 50-gram jars. All of the projects in my book Patterns of Color in Metal Clay can be made (and have been) with both the earlier and new generation.

The rest of the clay powders – copper, bronze, White Bronze, and Rose Bronze – are now available in both 100-gram and 50-gram jars.


Jul 15 2011

Rose Bronze Now Available

First, a new workshop has been added to my 2011 travel-teaching schedule. Right after the workshop at Studio 34 (3-day workshop, October 8-10), I will be teaching a 4-day workshop at MetalWerx in Waltham, MA, on October 13-16. Please see the contact info on my updated schedule.

You may recall that a while back I posted a recipe to make your own Rose Bronze. Since then, I have re-formulated Rose Bronze into a new product, now available on my online store. The firing instructions are already included in the Instruction Manual. It does not require a separate firing schedule and can be fired with copper, bronze and Pearl Grey Steel in the same firing batch.

Here are some pieces made with just Rose Bronze:

The following are rings with Rose Bronze, created by Jan Carpenter:

And here is a piece of Rose Bronze combined with Pearl Grey Steel:

When combined with clays other than Pearl Grey Steel in the same piece the pink color may disappear and create other colors, as demonstrated in the project “Mixing Colors – Rose Bronze Rock” in my recently published book: Patterns of Color in Metal Clay.

For the full color range, and to see the difference between Rose Bronze and copper, here are photos of all five colors (click to enlarge):

Rose Bronze is on the bottom left.

Rose Bronze is the Second from the right.

Rose Bronze is on the bottom left.

Rose Bronze is the second from the right.


Jul 6 2011

My New Book is Now Available

My fourth book: Patterns of Color in Metal Clay: Canes, Gradients, Mokume-Gane, has arrived from the printer and is now available for sale. Please click here to order. All pre-orders have been shipped as of today. Please contact us if you have not received the book within a reasonable time (12-15 business days for international orders, 4-6 business days for domestic orders).

Patterns of Color in Metal Clay

For a full description please download this excerpt, which contains the Introduction (“How to Read This Book”) and the Table of Contents.


Jun 25 2011

One Correction and Interesting News

There was a typo in the updated Instruction Manual, page 24, which has now been corrected. In schedule C, the hold temperature for the first phase for brick kiln is 1000°F/538°C. Please correct this on your printed page, or re-print that page.

As for the news: soon after my fourth book is released, I will also be releasing some new products, which may introduce further changes to the Instruction Manual. I am pretty excited about these latest developments. It seems to me that they will significantly expand our range of possibilities. The testing phase is almost over, and I hope that we can use these products in my upcoming workshops in Philadelphia (please don’t contact Holly; the workshop is full), at Studio 34 Creative Arts in Rochester, NY, and later in Massachusetts (details to be announced).

The photos above have something to do with the new products. On another note, a project of mine for the earrings above made in copper and sterling silver clays is about to be published in the next issue of Metal Clay Artist Magazine.

Cross your fingers, almost there!


Jun 23 2011

Instruction Manual Updated – June 2011

The instruction manual for Hadar’s Clay™ has been updated. Please download the new version (marked June 2011 on the title page). It is somewhat shorter because I’ve been trying to make it more user-friendly and eliminate repetition, as well as to save paper. The font and the photos are a little smaller, so if you need to see them in detail, you can always enlarge them on the screen. Please regard this manual as your free e-book, and a companion to all my printed books.

Also note that most of the information included in the manual – especially firing schedules – applies to all currently existing brands of metal clay. The manual now also includes firing schedule for Rose Bronze and mokume-gane from copper and silver.

The manual includes information regarding:

  • The carbon (“What do we expect a good carbon to be?”)
  • The firing box – advantages and disadvantages of different boxes
  • The firing process, step-by-step
  • How to do a simple test to find the firing schedule for your kiln
  • Compatibility chart (“What metal clays can be fired together in one piece and with what schedule?”)
  • How to talk to your kiln (programing instructions)
  • Checklist (“What did I do wrong?”)
  • Quick reference table for firing schedules (“Just give it to me in a nutshell”)
  • Suggested kiln programming (“Just tell me what button to push”)

All of these topics can be easily found through the table of contents.

The part about making test pieces is more elaborate now and accompanied by photos. It is meant to help you make your kiln work for you, no matter what type it is. It will also help you judge whether your pieces are over-fired or under-fired (not sintered).

You may notice that I now refer to brick kilns vs. muffle kilns (regardless of the location of the door). After firing in lots of kilns while travel-teaching over the past two years, I’ve concluded that the location of the door (top vs. front) has less effect on the firing temperature than the material from which the kilns are made.

I’ve also found out than if you use a circular firing box, pieces positioned near the door in a front loader are most likely to sinter just fine.

The compatibility chart shows photos of mixed metal pieces, illustrating which metal clays can be combined in one piece and how. It consists of two parts: A. metal clays that can be fired together in one (2-phase) firing, and B. metal clays that require firing one or two metals first, and adding other metals at a second firing (both 2-phase). It now includes the firing schedule for mokume-gane pieces from copper and silver.

Suggested programing shows how you can program your kiln to fire all clays, including silver, using only 4 programs:

  • Program 1 – burning the binder (first phase) in all base metal clays
  • Program 2 – sintering (second phase) bronze, Rose Bronze, mixed pieces of bronze/copper/Pearl Grey Steel. This program applies to silver as well: silver pieces can be actually fired at the same time, at the bottom of the kiln chamber.
  • Program 3 – sintering (second phase) White Bronze
  • Program 4 – sintering (second phase) copper alone, and Pearl Grey steel alone

Jun 9 2011

My Fourth Book is Available for Pre-order

Patterns of Color in Metal Clay

My book Patterns of Color in Metal Clay: Canes, Gradients, Mokume-Gane is about to come out in July and is now available for pre-order on my online store.

For a full description please download this excerpt, which contains the introduction (“How to Read This Book”) and the Table of Contents.


May 23 2011

Magnetic Clasp – Part 2

As promised, here’s the follow-up to my earlier Magnetic Clasp posting.

A magnetic clasp does not have to be steel colored. Here is another type of magnetic clasp, lentil shaped, in copper and bronze.

1. As molds, use two concave shapes such as contact lenses holders. The magnet should be 5-6 mm in diameter.

2. Find a rod or wooden dowel with the same diameter as the magnet, or slightly larger.

3. Fill the mold with Pearl Grey Steel. Press the dowel into the clay to create an indentation for the magnet. Do not use the magnet itself to create he indentation! It will be hard or impossible to separate it from the clay.

4. Repeat step 3 for the other part of the clasp.

5. Dry the clay.

The other side

The other side

6. Insert the magnet in one of the parts and test how they fit.

7. If the indentations are too small or not deep enough, grind them with a cylinder grinder or a diamond-plated burr until you get a perfect fit.

8. Roll a layer of bronze clay, 3 cards thick. Wet one of the domes and lay the bronze layer on it until it assumes its shape. Trim away the excess clay from around the dome, and dry.

9. Repeat step 8 with the other dome, this time using a copper clay layer.

10. Rub the open side of the domes over 150-grit sandpaper, using a figure-8 motion.

11. Prepare 2 wire eyelets form 22-gauge bronze wire. Drill a hole at the side of each dome.

12. Insert the wire eyelets in the holes and reinforce them with clay. Dry.

13. Fire the 2 parts following the schedule for mixed copper/bronze pieces (see my Instruction Manual, p. 30). I suggest connecting the chain first. If you do it after inserting the magnet, the chain and jump ring will stick to your pliers.

14. Connect each part to a chain and insert the magnet in one of them.


May 15 2011

Magnetic Clasp from Metal Clay, Part 1 – Free Project

There are two projects that did not make it into my upcoming book – two types of magnetic clasp (the third is in the book, which is going to press next week). The clasps are made from steel clay, taking advantage of its magnetism, and require no glue or any other kind of “magic adhesive”. Here is the first one. All it is is two tubes, capped on one side.

1. Make 2 tubes over a fat straw, from 1/2″ strips of steel clay (regular or Pearl Grey Steel), 3 cards thick. Dry them.

2. Roll a layer of steel clay, 3 cards thick. Wet it, and place the tubes on top of it, with one opening facing down.

3. Trim the excess clay from the layer around the tubes. Without picking them up off the card, carry them to the warming pan to dry.

4. Once they dry, drill two holes in each tube, close to the open side.

t-05

5. Fire the tubes. For the firing schedule, refer to the Instruction Manual (also linked on the right-hand pane of this blog).

6. Pick magnets with a diameter that fits inside the tubes. You can fill the tubes with a few magnets, as long as they don’t block the holes. The more magnets you fit, the stronger the clasp will be. Strong magnets are available from hardware stores, as well as from Amazon (look up “rare earth magnets“).

Once you fit the magnets in the tubes, it will be very hard to take them out. Make sure that the magnets at the bottom of the respective tubes are “opposite poles” that attract each other, not “identical poles” that repel each other!

7. For each tube you need a jump ring, and a piece of wire. The wire can be copper, bronze, or silver (steel or nickel-chromium wire will not ball up). Pick a gauge that fits through the holes. Ball up one end of the wire. This ball can be done with a micro-torch, unless it is 18 gauge or thicker.

8. Insert the non-balled end of the wire through one hole of the tube. Then insert it through the jump ring, and through the second hole.

9. Ball up the other end of the wire. Now use an oxygen/propane torch. The balling up will be so fast that the heat won’t affect the magnets. For instructions on balling up wire on both end see my book: The Handbook of Metal Clay: Textures and Forms, 2nd edition, pp. 30-31, or watch my video Balling-up a Wire at Both Ends on YouTube (also embedded in the Videos section of this blog, which can be accessed from the top bar or from the right-hand pane).

10. Connect a chain to the jump rings.

Variations:

Insert a wire through both holes. This wire has to be thin enough so that two pieces of it can fit in the same hole.

Pick one end of the wire, bend it above the tube, insert it through the opposite hole from the outside, and then again through the hole it came out of, from the inside.

Now you can ball up both ends of the wire, using a propane/oxygen torch.

Or: if you have no such torch, coil the end of the wire.

t-16

There are quite a few things you can do with this clasp, and my 14-year-old daughter, Naomi, volunteered to model.

No child was hurt during the shooting of these photos. In fact, Naomi says that she has the best parents ever! Are we lucky or what?


May 3 2011

NY Workshop and New Video Clip

First, a note about the workshop scheduled for October 7-10, 2011 at Studio 34 Creative Arts Center and Gallery, Rochester, NY. The structure of the workshop has changed. Instead of two, 2-day back-to-back workshops, it is now a single consecutive 4-day workshop. Since this is the second time I will be teaching at Studio 34, there are returning students who would like to learn new techniques and go into depth with familiar ones. The structure of this 4-day workshop will accommodate both experienced users of metal clay and users with little background. We will cover technical issues such as troubleshooting the firing process, and also play with the very latest techniques developed for metal clay (such as mokume-gane), as well as with the new clays – Pearl Grey Steel and White Bronze. Participants will be able to finish some pieces and to return home with the confidence to try things on their own.

Contact: www.studio34beads.com, studio34artists@aol.com, (585) 737 5858.

One important piece of equipment that is used in all my classes is Baldwin’s Patina. I am often asked what it is for. This patina is not for adding color. It is to highlight the contrast between different metals in mixed metal jewelry. It was originally invented for mokume-gane designs with silver and copper, since it reacts with copper and not with silver. I thought that since bronze is 90% copper, it would react with the patina as well. As it turns out, if the surface of the metal is well sanded and smooth, the patina reacts with copper and steel, but not with bronze and White Bronze. This makes the colors stand out in beautiful contrast.

Here is a video clip demonstrating the process:


© 2011 Hadar Jacobson – All Rights Reserved.
Still/video photography: Hadar Jacobson
Music selection and sound/video editing: Avi Jacobson


Apr 23 2011

Follow-up on Mokume-Gane with Copper and Silver

First – this is the last call for entries: my book Patterns of Color in Metal Clay: Canes, Gradients, Mokume-Gane, goes to the printer in about three weeks. If you have pieces that you would like to include, please hurry.

While mokume-gane literally means “wood grain metal,” when we say “mokume-gane design” we mean a much wider range of designs. Some of them I’ve shown in my blog posting Sterling Silver Clay, Copper Clay, and Mokume-Gane, and many of them will be introduced in my upcoming book. In the pieces shown in the next two photos, I’ve tried a design that looks like natural wood grain.

Both sintered at first firing, with no need to repeat the second phase. A project of mine about making wood grain design in copper, bronze, and Pearl Grey Steel is about to be published in one of the next issues of Jewelry Artist (Lapidary Journal).

Then I tried gradient surface, stripes, and mixed copper and silver.

The bird is made from pure copper clay. After the first firing it fell off and I had to re-attach it with paste. The paste was a mix of copper and silver, and so is the backing layer. The sun is made from a mix of equal amounts of copper and silver.

I was not so happy with the gradient part (the sky), so I made another attempt.

Both the sun and the bird came out very well attached to the background, but the copper part in them required repeating the second phase of firing. The gradient area sintered the first time.

These pieces bring to mind old sepia photos. It’s good to know that this option exists. Maybe when the price of silver becomes reasonable again we can practice it more widely. In the meantime, I am sticking to base metal clays, which are reasonably priced and allow a wider, richer range of color combinations.